Dr. Dish Arc1, Home, CT+, Rebel+, All-Star+, or FCLTY
- Testing Feed Function - The most effective way to test the Feed System is through the Diagnostics menu. In the Dr. Dish Player App or on your machine's tablet, with your machine powered on, navigate to the following Menu location. More > Support > Troubleshooting > Diagnostics > Machine Commands.
- Under Feed System - Please select Feed, the feed arm on the machine should actuate once. On your screen you should also see the Feed Switch status go from On to Off and back to On. If the Feed Arm does not move or the Feed Switch status does not change please move on to step 2.
- Manual Feed Video Guide - Please note the menu location in the video is different in the current software version.
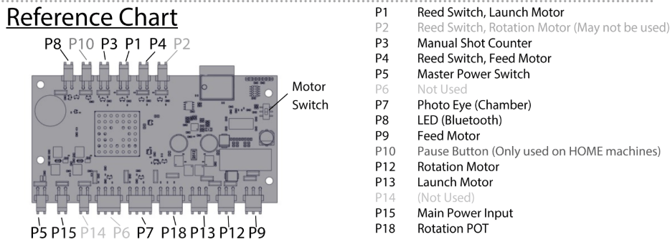
- Verifying Cable Connections - In order to verify the connections to the Power Board we will need to remove the left shroud form the machine, a guide is linked here. Please reseat both the P4 and P9 connections on the Power Board. These are labeled inside the machine, a reference chart is also below. After reseating those connections repeat Step 1, if the issue persists please let us know.
Dr. Dish CT
- Checking Feed Arm Bolt. - Please ensure the bolt is properly securing the Feed Arm. If this has failed please let us know.
- Testing Feed Function. - The most effective way to test the Feed System is through the Settings menu. On your machine's tablet, with your machine powered on, navigate to the following Menu location. Settings/Gear Icon > System Status > Diagnostics.
- Please Select Feed - The feed arm on the machine should actuate once. On your screen you should also see the Feed Switch status go from On to Off and back to On. If the Feed Arm does not move or the Feed Switch status does not change please move on to step 3. If the feed arm does move here but is not working in a drill we will need to test the Feed Photo Eye, please see step C below.
- Manual Feed Video Guide
- Testing Photo Eye - Please ensure all basketballs are removed from machine. While in the same diagnostics menu as step 2, locate Feed Photo Eye. This should be reading as Off at this point. To test it please cover the photo eye with your hand, it should change from Off to On. If it does not please proceed to step 3.
- Testing Photo Eye Video Guide
- Verifying Cable Connection. - In order to verify the connections to the Power Board we will need to remove the left shroud form the machine, a guide is linked here. Please reseat the P4, P6 and P9 connections on the Power Board. These are labeled inside the machine, a reference chart is also below. After reseating those connections repeat Step 2, if the issue persists please let us know.
If you were unable to resolve your issue through the troubleshooting process we’d love to assist you further! If you are already working with a representative please reply to them with the results of the troubleshooting. If you are not please start a support ticket here or you can call the Support+ Team at 612-412-4410!

