If your machine is launching but the distance is less than expected. Please see this article on Launch Spring troubleshooting.
Launch Troubleshooting
-
- Isolate Launch Function - Please refer to the video guide linked below to test the launch function. For safety reasons, it's crucial that you follow the steps exactly as demonstrated in the video. The machine in the video below is operating as expected.
Note: Each "beep beep" sound from the machine indicates a single launch command. For each command, the machine should pull back and release the launch arm once. If while performing this test you do not hear the launch command please see the Ball Ready Assembly Test below.
- One Launch Occurs - If a single launch occurs for each launch command as seen in the video above your launch system is working as intended. However, if the machine is still not launching during a drill, it's possible that the Ball Ready Assembly is not being properly triggered by the basketball. This would result in no launch command being sent, indicated by the absence of the usual "beep beep" sound.
- Ball Ready Assembly Test - To determine whether the Ball Ready Assembly is causing the issue, please unplug the component as demonstrated in the video below. After unplugging it, run a drill as you normally would.
If the machine functions correctly with the Ball Ready Assembly unplugged, please notify a Support+ Representative, as the assembly will need to be replaced.
Important: While operating the machine with the Ball Ready Assembly unplugged may temporarily resolve the issue, it will cause the machine to dry fire. This is not recommended for long-term use, as it may lead to further damage.
- Ball Ready Assembly Test - To determine whether the Ball Ready Assembly is causing the issue, please unplug the component as demonstrated in the video below. After unplugging it, run a drill as you normally would.
- Multiple Launches Occur - If the machine launches a number of times in quick succession after a single launch command the Launch Motor Reed Switch likely needs to be replaced.
- No Launch Occurs
- Loud Rapid Clicking/Grinding Noise - If there is a loud rapid clicking/grinding noise the Drive Motor has likely failed. If you believe this has happened on your machine please submit a video to our Support+ team. They will be able to assist you with getting a replacement part.
- Grab Arm Slipping - If the Grab arm is moving inside the machine but is not able to pull back the Launch Arm a few different issue are possible. Either the Drive Motors internal gears are damaged or the Launch Bumper may have fallen off of your machine.
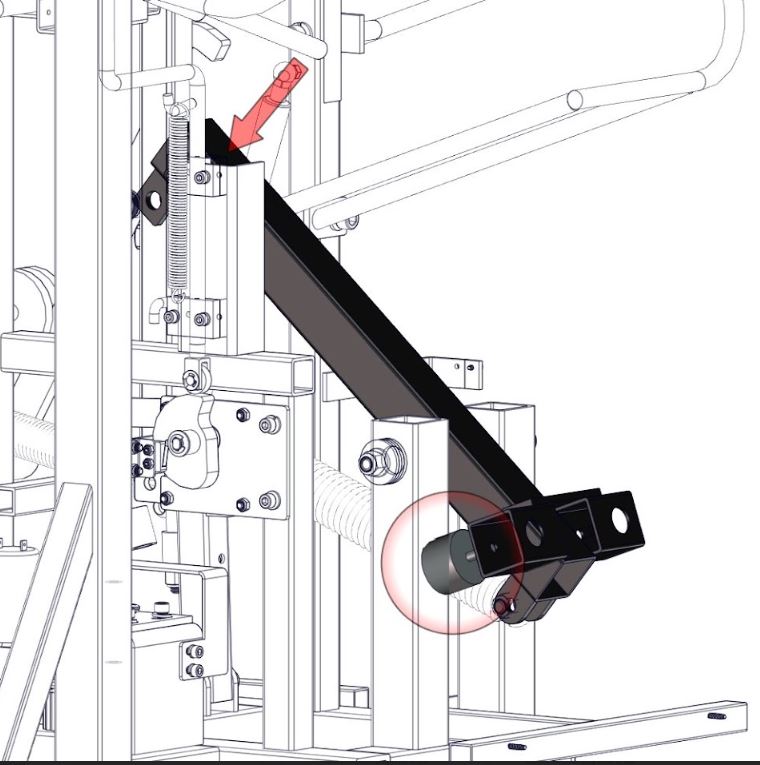
- Checking for Launch Bumpers - To see if the launch bumpers are present on your machine you will likely need to remove the shroud. You may be able to see them through the Launch Chamber but it will be difficult. The bumper location is indicated by the red circle below.
- Checking for Launch Bumpers - To see if the launch bumpers are present on your machine you will likely need to remove the shroud. You may be able to see them through the Launch Chamber but it will be difficult. The bumper location is indicated by the red circle below.
- No Noise - If there are no apparent noises or movement from the Launch Components there is likely an issue with power getting to the motor. In this case the 6-Pin cable connection the the Console needs to be checked.
- 6-Pin Cable - Please ensure the cable is securely connected to the console and that the white connection on the other end is secure.
***Please ensure that the machine is powered off and unplugged before performing the following steps***
- Remove the four screws that secure the console to the rear shroud.
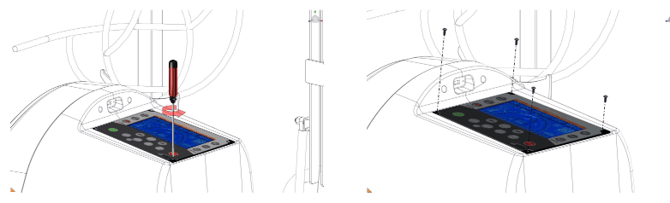
- Slightly lift up bottom of console, allowing only enough space to grab onto it with both hands. Carefully remove console by first pulling back towards you and then lifting straight up.
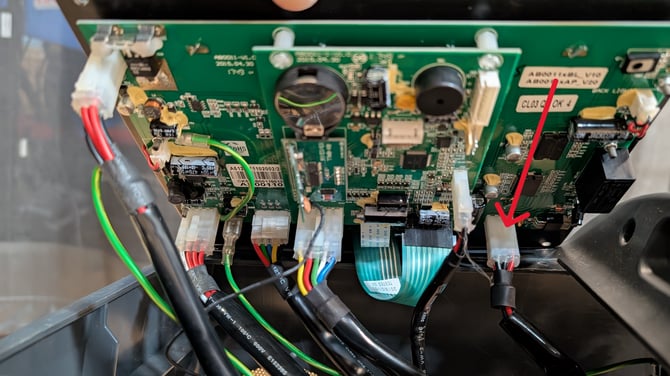
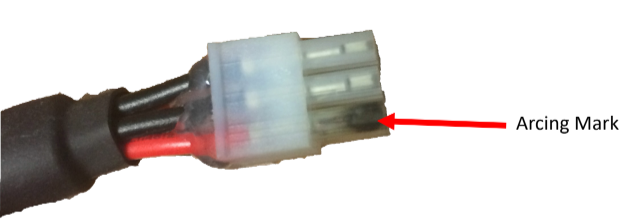
- Disconnect the 6-pin plug used to power the motors. Inspect the connector for any damage or black arcing marks. The 6-Pin Cable is indicated by the red arrow in the image below. If there are any black arcing marks the 6-Pin Cable and possibly the Console as well will need to be replaced.
- Remove the four screws that secure the console to the rear shroud.
- There are a few more connection points to check inside the machine that may have become disconnected. To do this you will need to remove the rear shroud. All three connection points are indicated below.

- 6-Pin Cable - Please ensure the cable is securely connected to the console and that the white connection on the other end is secure.
- One Launch Occurs - If a single launch occurs for each launch command as seen in the video above your launch system is working as intended. However, if the machine is still not launching during a drill, it's possible that the Ball Ready Assembly is not being properly triggered by the basketball. This would result in no launch command being sent, indicated by the absence of the usual "beep beep" sound.
- Timing Issues - If the machine is launching but the timing of the feed is not in sync with the launch please verify your settings.
- Power up and enter passcode.
- Hold down the right and left arrow simultaneously until it reads SETTINGS
- Arrow to the left once to DIAGNOSTICS, hold enter on YES- enter passcode PAN
- Check settings as listed below by scrolling with right arrow, if you need to change any of these to what the settings read below, press and hold enter on yes and adjust with arrow, press and hold enter on Yes to save.
- Isolate Launch Function - Please refer to the video guide linked below to test the launch function. For safety reasons, it's crucial that you follow the steps exactly as demonstrated in the video. The machine in the video below is operating as expected.
-
-
-
- Feed Before Throw Time 110
- Drive Motor Switch Time 20
- Feed Switch Timing 7
- Feeder Motor PWM 90
- Rotation Departure Time 70
- Feed Cycle Latency Time .10
-
-