Required Tools
-
10mm wrench
-
3mm hex wrench
-
Phillips-head screwdriver
-
Side cutters (wire cutters)
-
Zip ties
-
Camera or smartphone for taking a reference photo
- 4mm hex wrench - For shroud removal
Video Guide
Written Instructions
1. Preparation and Removal
-
Unplug Machine: Ensure the machine is completely unplugged from the power outlet before beginning any work.
-
Remove the Shrouds: Remove both shrouds from the machine.
- Tablet Power Supply: Not all Machines will have a Tablet Power Supply on the same side as the Machine's Power Supply. If your machine does have one removing it will make the process much easier.
- The bracket holding the Tablet Power Supply can be removed with a 10mm wrench
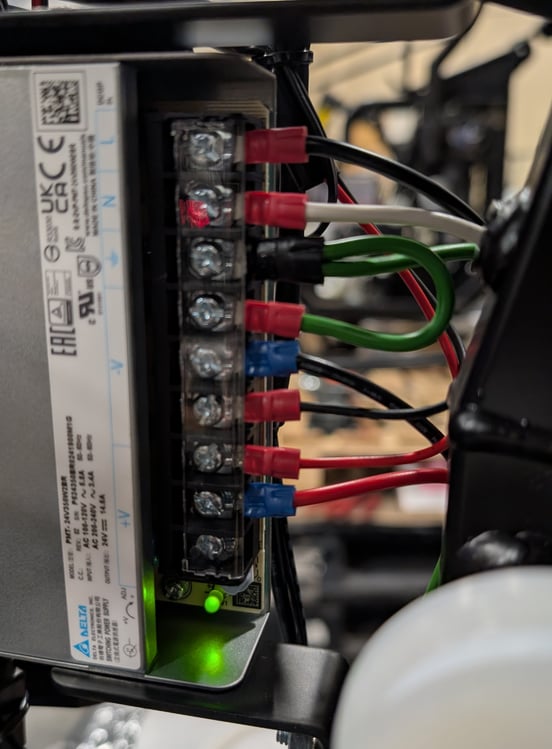
- Documentation: Use a camera or smartphone to take a clear, close-up picture of the wiring connections on the power supply. This is a crucial step for correctly reconnecting the new power supply.
-
Cut Zip Ties: Locate and cut any zip ties that are securing the power supply wires to the frame or other wires of the machine.
-
Disconnect Wires: Using a phillips head screwdriver, carefully loosen the terminal screws on the power supply. Do not unscrew them completely, as you want to avoid losing the screws. Loosen them just enough so the wires can be pulled out.
-
Remove the Power Supply: Use the 3mm hex wrench to unscrew the four mounting screws holding the power supply to the mounting bracket. There may also be a zip tie securing the power supply to the mounting bracket; cut this last to avoid the power supply falling. Carefully slide and maneuver the old power supply out of the machine.
2. Installation of New Power Supply
-
Position the New Power Supply: Slide the new power supply into place with the red voltage toggle switch accessible from the top of the launch bay (where the ball sits before it's launched). If you do not have someone to hold it in place while you secure the bolts, it may be easier to first secure it with a couple of zip ties to hold it in position.
-
Secure the Power Supply: Reinstall the four 3mm Allen bolts to securely fasten the power supply to the mounting bracket. Make sure they are tight, but not overtightened.
-
Connect the Wires: Refer to the picture you took in step 1. Insert each wire into its corresponding terminal, starting with the bottom connections and working your way up. Tighten the screws to secure each wire. Remember that the very bottom terminal is not used, and that some terminals have multiple wires.
3. Final Steps and Testing
- Tablet Power Supply: If you removed the Tablet Power Supply in Step 1 you will need to re-install that now. If you disconnected the AC Cord from the Tablet Power Supply ensure you securely reconnect that as well.
-
Initial Test: Before tidying up the wiring, plug the machine back in and turn it on. Check if the power turns on and if the machine successfully pairs with its tablet or mobile app. If everything works, you know the wiring is correct.
- Still Not Working: If the machine is still not powering on, the first step is to consult the reference photo you took in step 1 and ensure you have the wires connected properly. If that does not work please reach back out to your Service Representative for further assistance.
-
Secure the Wiring: Unplug the machine again. Use new zip ties to neatly secure all of the wiring, ensuring it's not in the way of any moving parts.
-
Final Test: Plug the machine back in, turn it on, and verify that all functions are working correctly. The replacement process is now complete.
Wiring Reference Images