If your machine is launching but the distance is less than expected. Please see this article on Launch Spring troubleshooting.
Dr. Dish Home, CT+, Rebel+, All-Star+, or FCLTY
- Manually Testing Launch - Ensure that all Basketballs are removed from the machine as the machine may launch while going through this process. In the Dr. Dish Player App or on your machine's tablet, with your machine powered on, navigate to the following Menu location, More > Support > Troubleshooting > Diagnostics > Machine Commands. Select “Launch“ a single Launch action should occur. You may have to select this twice depending on the position of the launch arm at the time. Ensure you are paying attention to the Launch Switch status as well. This should change from Off to On and then back Off.
- Launch Occurs - If the machine launches here but not in a drill the Launch Photo Eye should be tested, please proceed to Step 4. If Launch occurs but Launch Switch status does not change please proceed to Step 3.
- No Launch Occurs - If a launch does not occur please proceed to Step 2.
- Launch Test Video Guide - Please note the settings menu locations referenced in the video have been updated. The current location is More > Support > Troubleshooting > Diagnostics > Machine Commands.
- No Launch Troubleshooting - If no launch occurs we will need to check a few more things. These include the position of the Grab Arm, the Launch Fuse, as well as the connections to the Power Board.
- Grab Arm Position - The Grab Arm which is attached to the Launch Motor should be resting on top of the Launch Arm as seen in the image below.
- Grab Arm lodged under Launch Arm - If the Grab arm is lodged directly beneath the Launch Arm as seen in the image below you have experienced a Back Drive. If this issue is affecting you please reach out to the Support+ team letting them know you have experienced a back drive on your machine.
- Grab Arm lodged In the back of the machine - If the Grab Arm is lodged in the back of the machine as seen in the image below it is likely that your Launch Torsion Spring has failed. In this case a replacement part is needed. Please contact our Support+ team if you are not already working with a representative and let them know of the failed Launch Torsion Spring.
- Grab Arm lodged under Launch Arm - If the Grab arm is lodged directly beneath the Launch Arm as seen in the image below you have experienced a Back Drive. If this issue is affecting you please reach out to the Support+ team letting them know you have experienced a back drive on your machine.
- Grab arm did not move - If the Grab Arm did not move we will need to troubleshoot the connection on the Board as well as the Launch Fuse. In order to do this you will need to remove the left side shroud of the machine. Once you have gone through both steps below please re-test with Step 1.
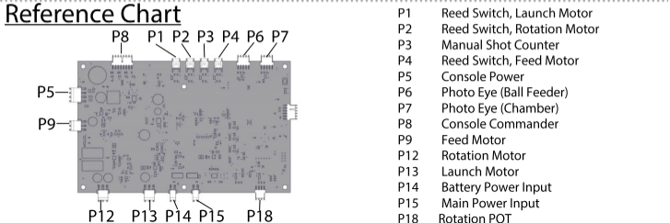
- Power Board Connection - Please reseat the P13 Connection on the Power Board. It is worth inspecting both the cable end and the connection point on the board for any damage. Please also ensure that the P13 harness is connected to the Launch Motor on the other end as seen in the image below.
- Launch Fuse -
At this point, the Launch Fuse should also be inspected for any signs of damage. The location of the Fuse is shown in the image above. The Black Plastic housing will need to be opened to remove the fuse for inspection. Refer to the images below for a comparison between a good fuse and one that requires replacement. The component to focus on is the Fuse Element—the thin, metallic strip encased in the translucent plastic housing. This strip is designed to break if the fuse blows due to an electrical overload.
To identify a damaged Launch Fuse, look closely at the Fuse Element through the plastic casing. In a functioning fuse, the metal strip will be intact and continuous. A blown or damaged fuse will typically show one or more of the following signs:
-
The metal strip appears broken or melted.
-
There may be visible scorching, discoloration, or a dark residue inside the casing.
-
The plastic housing might appear cloudy, burned, or distorted from heat.
If any of these signs are present, the fuse is no longer functional and should be replaced with a 10 amp mini blade fuse. These are commonly available at most auto parts stores.
Good Fuse
Damaged Fuse
-
- Fuse and Power Board Connection Video Guide
- Power Board Connection - Please reseat the P13 Connection on the Power Board. It is worth inspecting both the cable end and the connection point on the board for any damage. Please also ensure that the P13 harness is connected to the Launch Motor on the other end as seen in the image below.
- Grab Arm Position - The Grab Arm which is attached to the Launch Motor should be resting on top of the Launch Arm as seen in the image below.
- Launch Reed Switch Troubleshooting - If the machine launched but the Launch Switch status did not change there are a few things to check.
- Power Board Connection - In order to do this you will need to remove the left side shroud of the machine. Please reseat the P1 connection on the Power Board.

- Reed Switch and Magnet - First check to ensure the magnet, that the Reed Switch is triggered by, is still present on the grab arm assembly. It's a little hard to see from the top of the machine, but below is a picture showing what you are looking for. If it's not bright in your environment you may need a flashlight.
 The gap between the magnet and Launch Motor Reed Switch should be about 1/8" or 3mm. If it is not the Grab Arm's position will need to be adjusted, please contact the Support+ team for directions on this process. If the Magnet is not present a replacement Grab Arm Assembly will be required.
- Power Board Connection - In order to do this you will need to remove the left side shroud of the machine. Please reseat the P1 connection on the Power Board.
- Testing Launch Photo eye - Ensure that all Basketballs are removed from the machine. Then in the Dr. Dish Player App or on your machine's tablet, with your machine powered on, navigate to the following Menu location, More > Support > Troubleshooting > Diagnostics > Machine Commands. Locate Launch Photo Eye. The status should be Off when it is uncovered and ON when it is covered. You can test it's function by waving your hand over the Sensor. The Photo Eye's location is shown in the image below.

- Photo Eye Changes From Off To On - If the status changes as it should from Off to On, and the machine launched as it should in Step 1 the issue is likely related to the Rotation Function of the machine. The machine will not Launch a ball in a drill if it is not in the correct position. The first step to attempting to resolve that is Calibrating your machine. If the balls are not making it to the Launch Chamber, where the Launch Photo Eye resides you may be dealing with a Feed System issue.
- Photo Eye Status Does Not Change- The first step to resolve this issue is to gently wipe the Photo Eye off with a soft cloth, then re-test. If there is no change the connection on the Power Board should be checked. In order to check this you will need to remove the left side shroud from the machine. Please reseat the P7 connection, and re-test. If the status is still not changing a replacement Launch Photo Eye is needed.
- Launch Photo Eye Test Video Guide
- Issue Unresolved - If the issue is still not resolved after completing this troubleshooting and no apparent causes were found it is likely that the Launch Motor itself may need to be replaced. Please contact the Support+ team with the results of this process so that they can assist you further.


Dr. Dish CT
*** If your CT model is counting multiple launches before launching a ball please skip to Step 5 ***
- Manually Testing Launch - Ensure that all Basketballs are removed from the machine as the machine may launch while going through this process. On your machine's tablet, with your machine powered on, navigate to the following Menu location: Settings/Gear Icon > System Status > Diagnostics. On this screen you will need to locate the Launch option. Tap the Launch option, while also paying attention to the Launch Switch status. The Launch Switch Status should change from On to Off and then back On.
- Launch Occurs - If the machine launches here but not in a drill the Launch Photo Eye should be tested, please proceed to Step 3. If Launch occurs but Launch Switch status does not change please proceed to Step 2.
- No Launch Occurs - If a launch does not occur please proceed to Step 4.
- Manual Launch Test Video Guide
- Launch Reed Switch Troubleshooting - If the machine launched but the Launch Switch status did not change there are a few things to check.
- Power Board Connection - In order to do this you will need to remove the left side shroud from the machine. Please reseat the P1 connection on the Power Board. Then repeat Step 1.
- Reed Switch and Magnet - First check to ensure the magnet, that the Reed Switch is triggered by, is still present on the grab arm assembly. It's a little hard to see from the top of the machine, but below is a picture showing what you are looking for. If it's not bright in your environment you may need a flashlight.The gap between the magnet and Launch Motor Reed Switch should be about 1/8" or 3mm. If it is not the Grab Arm's position will need to be adjusted, please contact the Support+ team for directions on this process. If the Magnet is not present a replacement Grab Arm Assembly will be required.
- Power Board Connection - In order to do this you will need to remove the left side shroud from the machine. Please reseat the P1 connection on the Power Board. Then repeat Step 1.
- Testing Launch Photo Eye - Ensure that all Basketballs are removed from the machine. On your machine's tablet, with your machine powered on, navigate to the following Menu location: Settings/Gear Icon > System Status > Diagnostics. Locate Launch Photo Eye. The status should be Off when it is uncovered and ON when it is covered. You can test it's function by waving your hand over the Sensor. The Photo Eye's location is shown in the image below.
- Photo Eye Test Video Guide - This guide will walk you through testing both the Feed Photo Eye and the Launch photo Eye for the CT. model
- No Launch Occurs - If no launch occurs we will need to check a few more things. These include the position of the Grab Arm, the Launch Fuse, as well as the connections to the Power Board.
- Grab Arm Position - The Grab Arm which is attached to the Launch Motor should be resting on top of the Launch Arm as seen in the image below.
- Grab Arm lodged under Launch Arm - If the Grab arm is lodged directly beneath the Launch Arm as seen in the image below you have experienced a Back Drive. If this issue is affecting you please reach out to the Support+ team letting them know you have experienced a back drive on your machine.
- Grab Arm lodged In the back of the machine - If the Grab Arm is lodged in the back of the machine as seen in the image below it is likely that your Launch Torsion Spring has failed. In this case a replacement part is needed. Please contact our Support+ team if you are not already working with a representative and let them know of the failed Launch Torsion Spring.
- Grab Arm lodged under Launch Arm - If the Grab arm is lodged directly beneath the Launch Arm as seen in the image below you have experienced a Back Drive. If this issue is affecting you please reach out to the Support+ team letting them know you have experienced a back drive on your machine.
- Grab arm did not move - If the Grab Arm did not move we will need to troubleshoot the connection on the Board as well as the Launch Fuse. In order to do this you will need to remove the left side shroud of the machine. Once you have gone through both steps below please re-test with Step 1. Manually Testing Launch.
- Power Board Connection - Please reseat the P13 Connection on the Power Board. It is worth inspecting both the cable end and the connection point on the board for any damage. Please also ensure that the P13 harness is connected to the Launch Motor on the other end. The image below shows where this is located.

- Launch Fuse -
At this point, the Launch Fuse should also be inspected for any signs of damage. The location of the Fuse is shown in the image above. The Black Plastic housing will need to be opened to remove the fuse for inspection. Refer to the images below for a comparison between a good fuse and one that requires replacement. The component to focus on is the Fuse Element—the thin, metallic strip encased in the translucent plastic housing. This strip is designed to break if the fuse blows due to an electrical overload.
To identify a damaged Launch Fuse, look closely at the Fuse Element through the plastic casing. In a functioning fuse, the metal strip will be intact and continuous. A blown or damaged fuse will typically show one or more of the following signs:
-
The metal strip appears broken or melted.
-
There may be visible scorching, discoloration, or a dark residue inside the casing.
-
The plastic housing might appear cloudy, burned, or distorted from heat.
If any of these signs are present, the fuse is no longer functional and should be replaced with a 10 amp mini blade fuse. These are commonly available at most auto parts stores.
Good Fuse
Damaged Fuse -
- Power Board Connection - Please reseat the P13 Connection on the Power Board. It is worth inspecting both the cable end and the connection point on the board for any damage. Please also ensure that the P13 harness is connected to the Launch Motor on the other end. The image below shows where this is located.
- Grab Arm Position - The Grab Arm which is attached to the Launch Motor should be resting on top of the Launch Arm as seen in the image below.
- Multiple Attempts - If your machine is counting multiple Launches before a ball is launched, but it does eventually launch. Please reach out to the Support+ team being sure to include a video of the issue. They will then be able to provide further assistance in resolving the issue.
- Issue Unresolved - If the issue is still not resolved after completing this troubleshooting and no apparent causes were found it is likely that the Launch Motor itself or the Power Board may need to be replaced. Please contact the Support+ team with the results of this process so that they can assist you further.