If your rotation is working but it's not quite in the right position, calibration is always the first step. Recalibration is likely to clear the E-1 error as well. The guide on that process is here!
If you still have any rotation position issues, or if the machine isn't rotating, please follow the troubleshooting steps below. If any steps do not meet the correct results, please notate what that step was and what your result was. Then continue down the article for your model. If a service ticket is needed please include your testing results and the serial number of your machine!
General Rotation Troubleshooting
- Verify that the machine exhibits smooth drag baseline to baseline. - Drag is the winding noise that the machine makes when it is moved side to side. The noise is the internal gears moving inside of the motor casing. You can check the drag by moving the machine baseline to baseline with the machine OFF. If at any point you feel increased resistance do not force the machine to rotate as this can cause further damage. Please see the video guide below.
- Drag Test Video Guide
- Smooth Drag - If the machine exhibits smooth drag from baseline to baseline please proceed to Step 2.
- If Drag Is Not Smooth - To determine the source of the issue, we need to identify whether the resistance is caused by an internal failure of the Rotation Motor or an issue with the External Gears. The easiest way to do this is by recording a video of the gears while performing the drag test. To capture this, place a mobile phone directly underneath the Rotation Motor and Main Gear, as shown in the video below. Please include your video when contacting your Support+ Representative if there was an issue discovered:
- Gears Are Flush - If the teeth of the Rotation Motor Gear and the Main Gear are aligned with each other, with no vertical gap or height mismatch. This indicates that the Rotation Motor Gear and Main Gear are seated correctly. If the drag is still not smooth, the issue is likely internal to the Rotation Motor.
Note: Even if the gears are flush, inspect closely for any chipped or damaged gear teeth, as this can also cause resistance or erratic movement during rotation. - Gears Are Not Flush - If the gears are not aligned as they should be the Rotation Motor Assembly will likely need to be adjusted. Please contact a Support Specialist for further instruction on this process.
- Gears Are Flush - If the teeth of the Rotation Motor Gear and the Main Gear are aligned with each other, with no vertical gap or height mismatch. This indicates that the Rotation Motor Gear and Main Gear are seated correctly. If the drag is still not smooth, the issue is likely internal to the Rotation Motor.
- Drag Test Video Guide
- Motor Function - With the machine powered on. The calibration process should be attempted.
- No Movement - If while attempting calibration the machine does not rotate at all there are a few things to check. If your Serial Number is higher or equal to the following, DDA08180002227, DDP08180001234, DDR08180001136, you have a Rotation Breaker. If it is lower you will only need to check the 6-Pin Cable.
- Rotation Breaker - Please refer to the video below, which shows its exact location. If the breaker has tripped, it will need to be pressed back in. Keep in mind that the breaker is not easily visible during the reset process, so you may need to rely on touch to locate and reset it.
- Rotation Breaker Location
- Rotation Breaker Location
- 6-Pin Cable - Another possible cause of the Rotation Motor not moving is the 6-Pin cable. Please ensure the cable is securely connected to the console and that the yellow connection on the other end is secure.
***Please ensure that the machine is powered off and unplugged before performing the following steps***
- Remove the four screws that secure the console to the rear shroud.
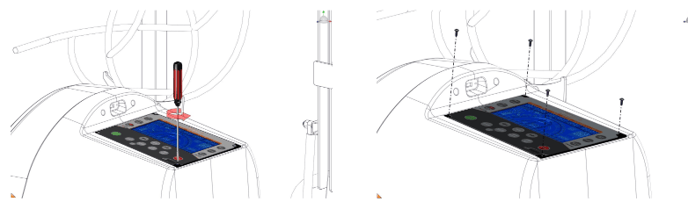
- Slightly lift up bottom of console, allowing only enough space to grab onto it with both hands. Carefully remove console by first pulling back towards you and then lifting straight up.
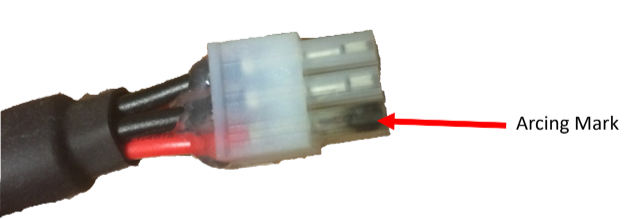
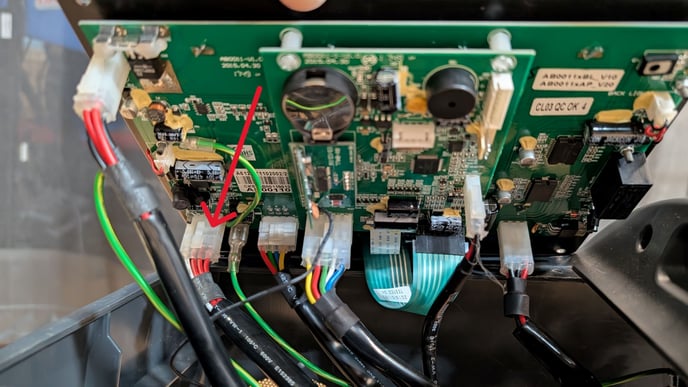
- Disconnect the 6-pin plug used to power the motors. Inspect the connector for any damage or black arcing marks. The 6-Pin Cable is indicated by the red arrow in the image below. If there are any black arcing marks the 6-Pin Cable and possibly the Console as well will need to be replaced.
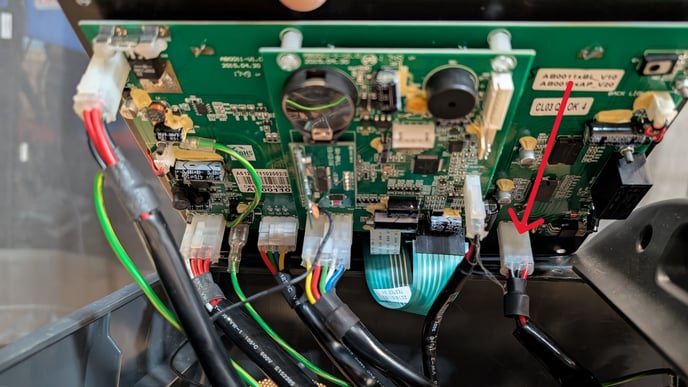
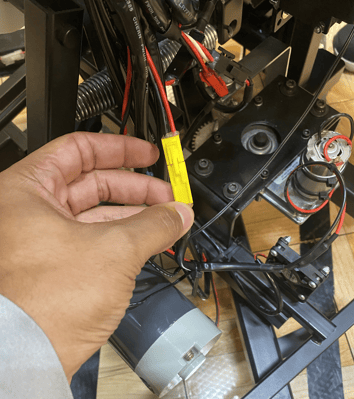
- The last piece to check is the Connection from the 6-Pin to the Rotation Motor. Follow the 6-pin cable until you reach the yellow connectors seen in the image below. Ensure this connection is secure.
- Remove the four screws that secure the console to the rear shroud.
- Rotation Breaker - Please refer to the video below, which shows its exact location. If the breaker has tripped, it will need to be pressed back in. Keep in mind that the breaker is not easily visible during the reset process, so you may need to rely on touch to locate and reset it.
- Calibration Starts But Does Not Complete - If the console says calibrating but no movement occurs please see the above Step 2a: "No Movement".
- Calibration Error - If "Calibration Error" is present on the console we will need to troubleshoot the Potentiometer. Please see the video below on this process.
- Potentiometer Value = 480-520 - Your Potentiometer is calibrated correctly and there is likely another issue at hand.
- Potentiometer Value = 0, 32, or 33 - Your Potentiometer has either failed or simply become disconnected. Please reseat the 8-Pin Cable to the console seen in the image below. Then go back to engineering mode to see if the value has changed. If it has not you will likely need a new Potentiometer.
- Potentiometer Value = Any other number - If your Potentiometer is not reading between 480-520, while facing the Free Throw line, as seen in the video above. The Potentiometer will need to be manually re-calibrated. Please see the video below on this process. The back shroud will need to be removed to complete this process as well, a guide is linked here.
- Stuck On Baseline - During calibration, the machine may stop at the baseline with no error message, accompanied by a humming noise. This indicates an issue with the rotation switch. The machine uses two rotation switches to detect when it has reached the baseline and can begin rotating back to center. If it gets stuck at the baseline, try manually pressing the corresponding rotation switch to continue the calibration process. Please see the video guide below. If pressing the switch manually has no effect the switch itself has likely failed. Please note which has failed when contacting your Support+ Representative.
- Manually Hitting Rotation Switch Video Guide
If you were unable to resolve your issue through the troubleshooting process we’d love to assist you further! If you are already working with a representative please reply to them with the results of the troubleshooting. If you are not please start a support ticket here or you can call the Support+ Team at 612-412-4410! Remember to have noted any steps did not meet the correct results and have those handy for the phone call or add them to the ticket!
- Manually Hitting Rotation Switch Video Guide
- Calibration Error - If "Calibration Error" is present on the console we will need to troubleshoot the Potentiometer. Please see the video below on this process.
- No Movement - If while attempting calibration the machine does not rotate at all there are a few things to check. If your Serial Number is higher or equal to the following, DDA08180002227, DDP08180001234, DDR08180001136, you have a Rotation Breaker. If it is lower you will only need to check the 6-Pin Cable.
